Background
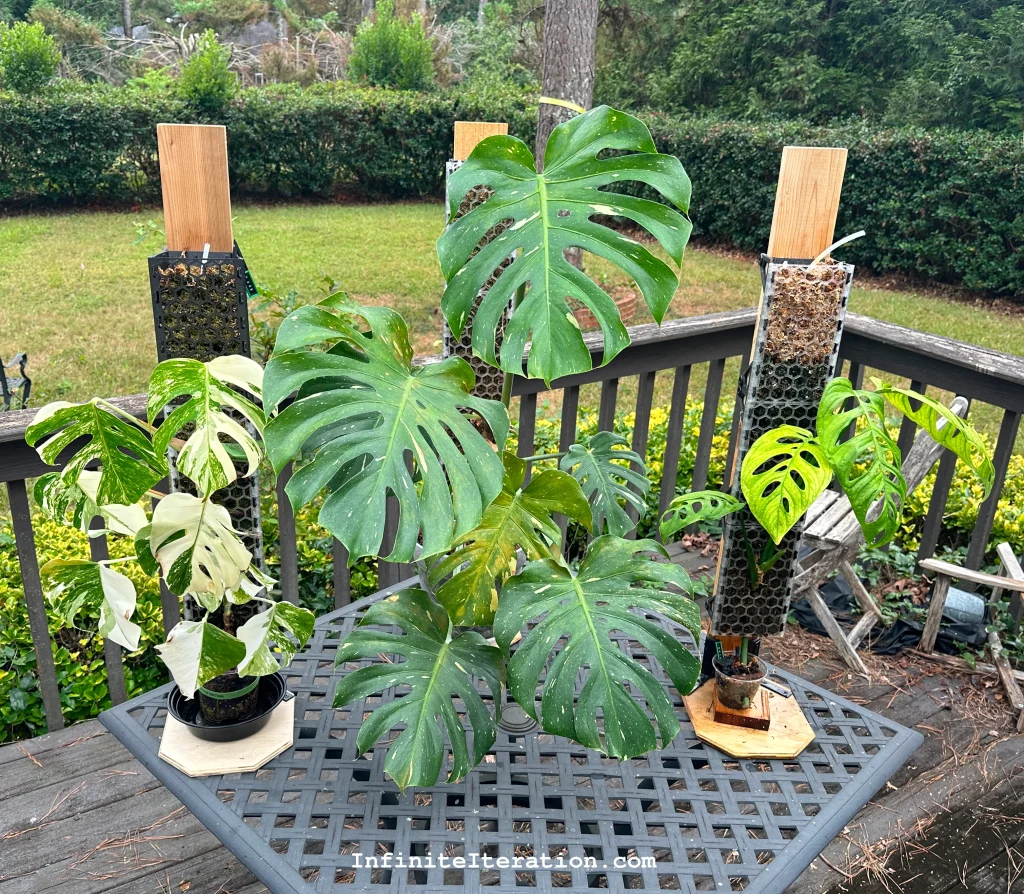
This page describes the custom moss-pole structure I designed to support large tropical aroids (e.g., monstera, philodendron, epipremnum).
Aroids are hemiepiphytes that grow up tree trunks to compete with other plants for light access in the dense understory of rainforests. Since the tree is not harmed or benefitted, this is an example of commensalism, as opposed to parasitism or mutualism.

An aroid’s stem produces roots that grow around and down the trunk, gathering water from its surface. This supplementary root mass and its additional nutrient+water uptake is essential to foster large foliage.
When grown without vertical support, they tend to flop over and get “leggy”, allocating resources to stretching out in search of a tree to climb instead of producing larger and more dense foliage. The adventitious “aerial” roots the stem produces reach out for support and and find nothing to attach to. Regardless of the light conditions, the plant can sense which way is “up” and is unsatisfied when its stem is growing another direction.
To better mimic the plant’s natural environment and produce more mature foliage, aroid collectors provided their plants with various types of simulated tree trunk – planks of wood, sphagnum moss poles, coco coir poles, and others – with moist sphagnum moss seeming to work best.
Some of the most impressive results I’ve seen are the plants that Syndey Plant Guy on YouTube has grown on moss poles.

Limitations of market offerings
Most moss-pole market offerings do not simulate a tree trunk well – they’re too small, don’t retain enough moisture, don’t accommodate much root mass, etc. When they do provide benefit, it’s mostly in the form of vertical support only, with the plant typically failing to grow a supplemental root system in or around the pole.
Nonetheless there are several market offerings that, when watered frequently, can provide vertical support, moisture, and a space for the roots to occupy and thrive, but there are still practical challenges:
- One large disadvantage of the standard offerings is a lack of modularity, making transplant very challenging. When the plant reaches the top of the pole, it’s desirable to transplant its “top cutting” to a new pole and continue maturation, but this requires retaining enough of its root mass to avoid regression. Most moss poles do not easily accommodate this “chop-and-prop” operation; the root mass is completely trapped in the monolithic pole structure, and the pole is not vertically separable, so moving an upper pole section to a new pot is not feasible. The only option left – extricating the root mass from the pole – is sufficiently destructive that subsequent leaves regress significantly in size once the plant begins to grow again on/in the new pole. A modular structure that supports chop-and-prop is needed.
- Most moss-pole designs also lack structural stability. They are typically meant to be inserted into the planter before the potting medium is added. It’s harder than it seems to hold the pole in the right place and fill the pot the right way to end up with a properly-balanced resulting “assembly”. Then as the plant grows roots into the pole, the center of mass gradually rises and makes toppling likely. A better anchoring method is needed.
- Embedding the pole in the pot also makes re-potting difficult. Often a plant’s root system outgrows the planter and has to be transplanted. It would be convenient if the pot could be changed without having to also transplant the pole.
- Many commercial poles have relatively low cross-sectional area, holding a less-than-ideal volume of moss. Holding more moss would make the assembly even more top-heavy, so this is hard to achieve without a structural change.
- Many commercial poles also expose the moss on all sides, increasing evaporative loss. Only the side against the plant should expose moss.
Requirements for my new design
- Modularity
- Vertical extensibility
- Vertical separability (for chop and prop)
- Front-to-back separability for initial plant embedding
- Closed back to reduce evaporative loss
- Method of anchoring to the pot
- Provisions for watering
- Front pattern that can be broken or cut apart if needed to facilitate initial embedding
- Ability to change pot without disturbing pole too much
Design

My design connects moss pole to planter indirectly using an external structure. The 3D-printed segments that hold the moss attach to a cedar plank that connects to a base that the planter sits on. This sort of “exoskeleton” allows the moss-pole sections to slide along the plank, so I can separate pole from planter for repotting if needed, and pretty much any planter that fits on the base can be used. While at rest, the moss-pole sections clamp in place around the plank with furniture screws. The structure holds everything fixed relative to each other, and the whole assembly is easily picked up by just grabbing the frame.

The moss-pole sections have a removeable front face that snaps into place. This part is relatively thin PETG, so small hex segments can be trimmed out to accommodate the initial setup, or they can be cut apart completely in the event the plant and roots need to be removed later.
Since the moss-pole segments can be vertically separated, complete upper segments can be removed (cutting the stem and some roots in between) and transplanted to another pole to continue growing. It will bring its roots and growing medium along with it to the new pole to prevent regression in leaf size. This is the primary innovation of this design.

The modularity also means I don’t have to set up 3 years of moss pole for a plant at once. I can just embed the baby plant in one section and add sections above it over time.
I can use any number of segments I want to adapt to different spaces – if I don’t have the headroom for all three sections, I can use a shorter plank and only two sections. Or if I have a taller window, I can use a taller plank and more than three sections.
Irrigation
Keeping enough moisture in the moss requires frequent attention. I’ll water into the open top and use an LDPE squeezy bottle w/ the 90-degree straw thing to squirt onto and into the front face, but it can be hard to ensure the middle and lower sections are thoroughly damp.
The way I chose to address this was to embed a polyethelyne tube down through the center of the moss. I poked holes sideways periodically along its length using a tack and plugged the tube’s bottom end with hot glue. I use a syringe plugged into the top end of the tube to force water deep into the moss.
